ESP32 development board can be used as WiFi router/repeater with NAT(Network Address Translation), thanks to martin-ger, who developed this great firmware for that purpose.
Setup and installation
- Install esptool.
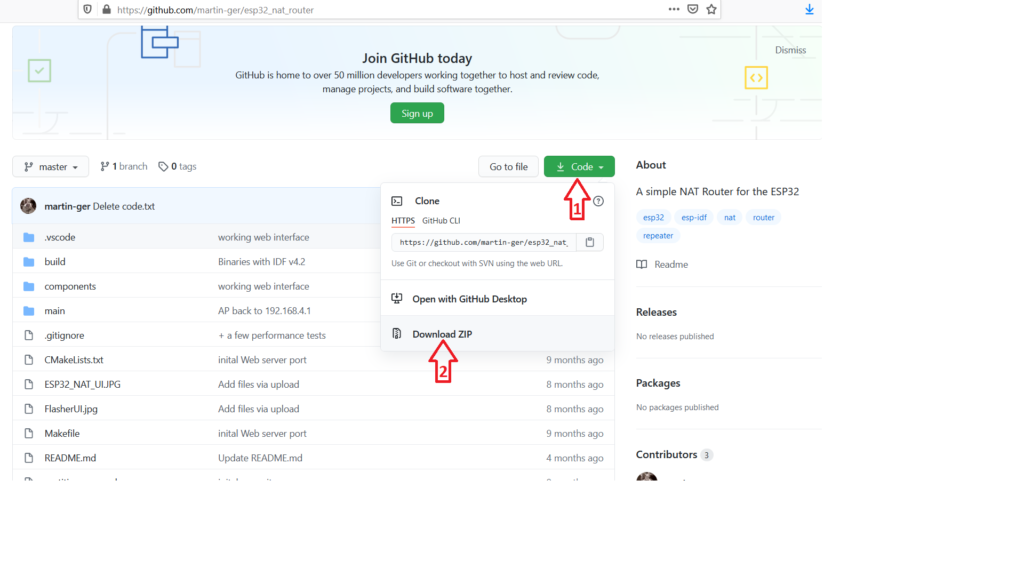
- Download the project form its GitHub page.

Or using GitHub CLI:
gh repo clone martin-ger/esp32_nat_router- Unzip the project and go inside its main directory.
- Connect your ESP32 to your computer(Get your ESP32 form AliExpress, Gearbest or Banggood).
- Enter the following command:
esptool.py --chip esp32 --port /dev/ttyUSB0 --baud 115200 --before default_reset --after hard_reset write_flash -z --flash_mode dio --flash_freq 40m --flash_size detect 0x1000 build/bootloader/bootloader.bin 0x10000 build/esp32_nat_router.bin 0x8000 build/partitions_example.binFor Linux /dev/ttyUSB0 is the name of the serial port, make sure that you specify the name of the serial port to which ESP32 is connected. While for Windows, serial ports are named something like COM1, COM2 and so on.
First boot
After first power up, your new ESP32 router will create an open WiFi network with SSID “ESP32_NAT_Router”.
Now, you can configure your ESP32 router, either using simple web interface or via the serial console.
Configuration via web interface
- Connect your PC or smartphone to the open WiFi network “ESP32_NAT_Router”.
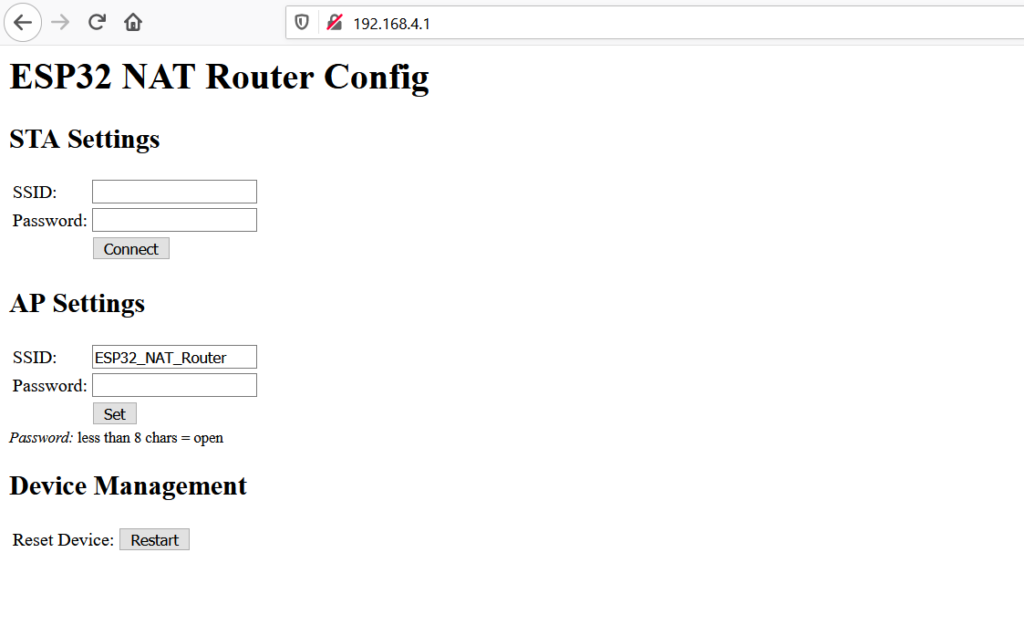
- Open your browser and go to “http://192.168.4.1“. Subsequently, you should have the following page on your screen:

- At first, enter the correct values for the uplink WiFi network, in the STA Settings section. For open networks, leave the password field blank. Then, press Connect. After that, the ESP32 will reboot and connect to your WiFi AP.
- Now, you reconnect and reload the page again, then you modify the AP Settings. So, you enter a new SSID and password for your ESP32 router. Then, click Set, the ESP32 will reboot again and its ready to forward traffic over the newly configured AP. If you want to make further changes, you need to connect to the newly configured AP.
Because the web interface is not secure and not protected with a password, anyone can open it and modify the settings. To get around that, the web interface can be disabled via the command line interface by the following commands:
esp32>nvs_namespace esp32_nat
esp32>nvs_set lock str -v 1
After reboot, the web interface is no longer available. To re-enable it, enter the following commands:
esp32>nvs_namespace esp32_nat
esp32>nvs_set lock str -v 0
Configuration via command-line interface
- Connect your ESP32 to the USB port of your computer.
- Open the serial port to which your ESP32 is connected, using Putty or any other serial terminal with baud rate set to 115200 bps.
- After successful connection, type the following command, replacing <ssid> and <password> with your uplink WiFi network SSID and password respectively.
esp32>set_sta <ssid> <password>- Now, using the “set_ap” command, you set your ESP32 access point SSID and password.
esp32>set_ap <ssid> <password>- Finally, type “restart” to reboot the ESP32 with your new configurations.
esp32>restart- During configuration, If you want to enter non-ASCII or special characters (such as ‘ ‘) within your SSID or password, you have to use HTTP-style hex encoding (e.g. “Access%20Point” results in a string “Access Point”).
- If you made a mistake and you can’t communicate with the ESP32 anymore, you can use the serial console to reconfigure it. The parameter settings are stored in NVS(Non Volatile Storage), which will not be erased by re-flashing the binaries. However, you can wipe it out, by this command
esptool.py -p /dev/ttyUSB0 erase_flash - In the serial console, if you want to show the current configurations use
showcommand. And you can typehelpto get the full list of available commands.
Share
Other articles you may find interesting
Advertisment


A wholly agreeable point of view, I think primarily based on my own experience with this that your points are well made, and your analysis on target. Goldarina Kory Wojcik
Thank you
My wife and i got so cheerful when John could finish off his preliminary research using the ideas he had while using the weblog. It’s not at all simplistic to simply find yourself handing out steps some other people could have been making money from. And we see we have the blog owner to thank for this. The most important illustrations you have made, the easy website navigation, the relationships you will make it possible to create – it is many overwhelming, and it’s helping our son and our family do think this theme is excellent, which is very mandatory. Thank you for all! Curtis Cortis
“Appreciate you sharing, great blog. Keep writing.” Linwood Borozny
I value the blog.Really looking forward to read more. Cool. Winston Mendler
There is certainly a lot to learn about this subject. I love all of the points you’ve made.